
This guide explains how to properly use and customize the following prompt to generate high-quality minimalist CGI posters:
Base Prompt:
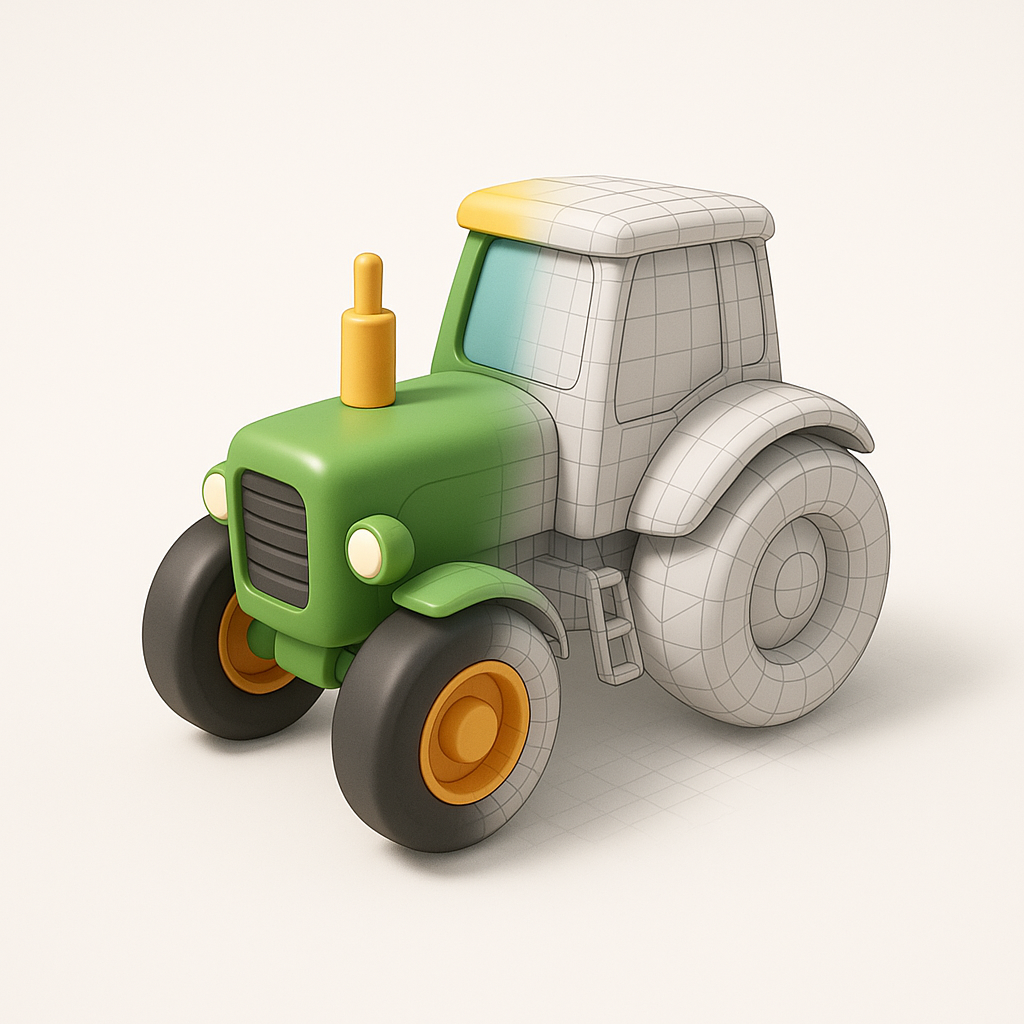
Create a minimalist CGI poster with a [x:y] aspect ratio, featuring a [object] as a stylized 3D model in a charming, childlike aesthetic. The composition should show the object seamlessly transitioning from a simplified-color 3D render on one half into a clean, quad-based polygonal mesh on the other. The mesh is light gray, with pure white polygons on highlighted areas and darker shades in the shadows, rendered with a turbosmooth-like subdivision surface for a soft appearance. Use a pure white background, a stylish camera angle with dynamic perspective, and employ soft lighting and shadows to enhance the overall cuteness and appeal.
Below is a complete guide to understanding, customizing, and optimizing this prompt.
1. Understanding the Concept
This prompt creates a split-style 3D render:
• One half shows a smooth, colorful, finished 3D model.
• The other half reveals the underlying polygon mesh.
The result looks like a transition between final render and 3D modeling stage, producing an attractive and educational CGI-style poster.
This style is widely used in:
• Game asset presentations
• Animation design showcases
• Product CGI posters
• Toy or mascot branding visuals
• Technical modeling portfolios
2. Key Elements of the Prompt Explained
A) Aspect Ratio [x:y]
Controls poster format.
Common choices:
• 1:1 — Instagram posts
• 4:5 — social media portrait posts
• 16:9 — presentations and screens
• 9:16 — stories and reels
• 3:4 — poster-style visuals
Example:
Create a minimalist CGI poster with a 4:5 aspect ratio…
B) Object Selection [object]
This determines what appears in the poster.
Great objects for this style:
- Vehicles
- Tractors
- Cars
- Scooters
- Boats
- Planes
- Characters
- Animals
- Mascots
- Robots
- Game characters
- Products
- Headphones
- Shoes
- Furniture
- Toys
Example:
featuring a stylized 3D tractor…
Objects with rounded forms work best.
C) Stylized Toy-Like Aesthetic
The prompt requests:
• Rounded shapes
• Smooth edges
• Friendly proportions
• Soft materials
• Playful appearance
This creates a Pixar/toy-style CGI feeling.
Avoid realistic, harsh details.
D) Render-to-Mesh Transition
The main visual effect:
One side:
• Smooth colors
• Clean surfaces
• Final product look
Other side:
• Visible polygon mesh
• Modeling structure
• Technical aesthetic
The blend should feel seamless.
E) Mesh Appearance
Mesh should include:
• Light gray base color
• Bright white highlights
• Slightly darker shadows
• Rounded, subdivided geometry
This prevents the mesh from looking harsh or sharp.
F) Camera Angle
Dynamic camera angles improve realism:
Recommended angles:
• Slight low angle (hero shot)
• Three-quarter perspective
• Slight rotation view
Avoid flat front views.
G) Lighting
Lighting should be:
• Soft
• Clean
• Studio-like
• Shadow-balanced
Goal: cute and polished, not dramatic.
3. How to Customize the Prompt
You can enhance results by adding:
Style modifiers
• glossy plastic material
• soft matte finish
• pastel colors
• cartoon proportions
• studio lighting
• smooth reflections
Example:
with soft plastic materials and pastel colors
Composition modifiers
• centered composition
• floating object
• soft ground shadow
• minimal shadow floor
Quality boosters
Add phrases like:
• ultra-clean render
• high detail
• professional CGI
• studio render
• product poster quality
4. Optimized Prompt Example
Here is an improved version:
Example Prompt
Create a minimalist CGI poster in a 4:5 aspect ratio featuring a stylized 3D tractor with a playful toy-like aesthetic. Show a seamless transition where one half appears as a smooth colorful render while the other blends into a clean quad-based polygonal mesh. The mesh is light gray with bright white highlights and soft shadow shading, using subdivision surfaces for rounded geometry. Place the model on a pure white studio background with a dynamic three-quarter camera angle, soft lighting, and subtle shadows for a cute, polished, professional appearance.
5. Best Objects to Try
This style works excellently with:
- Animals
- Cars
- Robots
- Furniture
- Kitchen appliances
- Game assets
- Tools
- Construction vehicles
- Mascots
- Cartoon characters
6. Common Mistakes to Avoid
Avoid:
• Too dark lighting
• Overly realistic textures
• Complex backgrounds
• Sharp mesh edges
• Flat camera angles
• Excessive detail clutter
The strength of this prompt is simplicity and clarity.
7. Professional Use Cases
This style is perfect for:
Game asset previews
Brand mascots
3D portfolios
Product design showcases
Social media visuals
Children’s content graphics
Toy product promotion
8. Final Tips for Best Results
- Use simple objects first.
- Prefer rounded shapes.
- Keep colors soft and friendly.
- Use dynamic camera angles.
- Maintain clean backgrounds.
Small prompt tweaks can dramatically improve quality.
Conclusion
This prompt is powerful because it combines cute stylized rendering with technical 3D modeling visualization, making visuals both appealing and professional.
With small modifications, you can create unlimited poster variations for vehicles, characters, products, or mascots.

Leave a Reply