
This guide explains step-by-step how to make the most of the prompt:
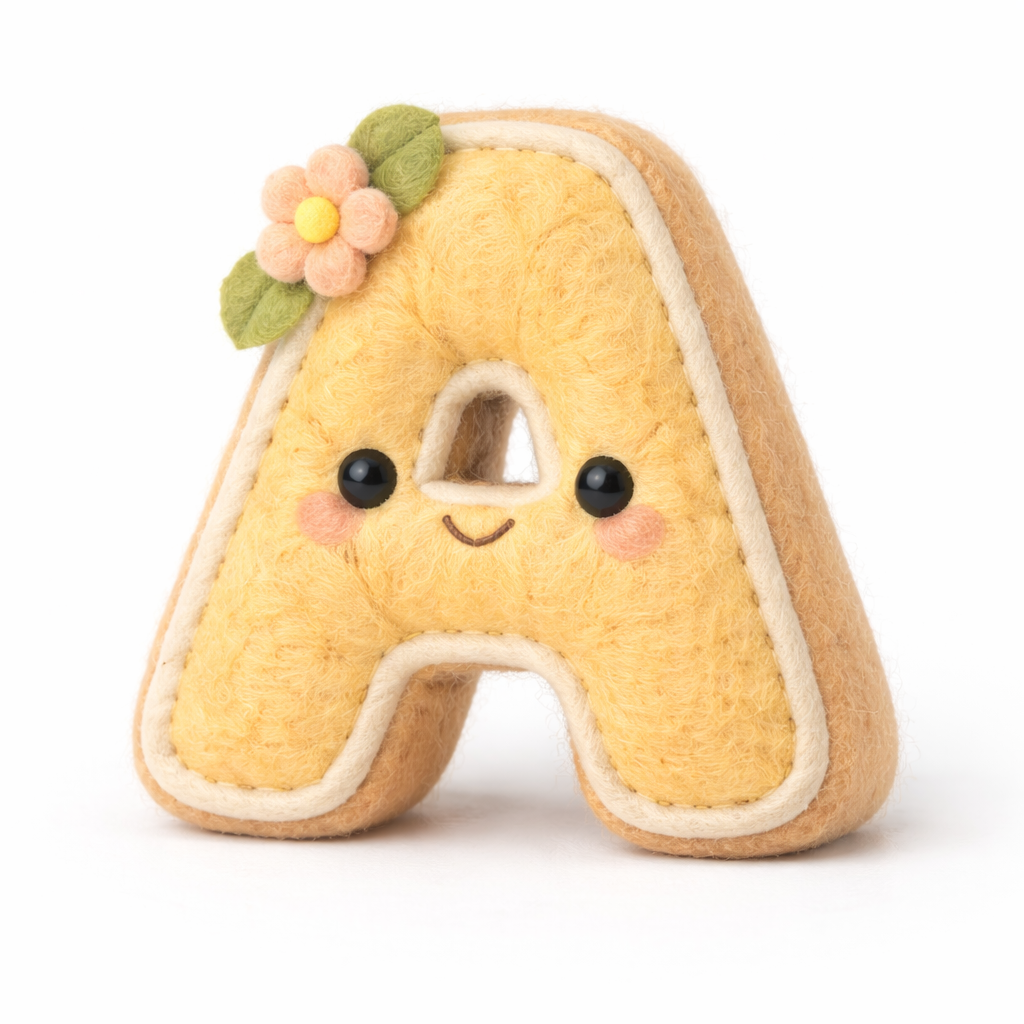
“A hyper-realistic 3D render of a soft felt plush [object], made of wool fabric texture with visible fiber details. Placed on a clean pure white background. Professional studio lighting with soft shadows, ultra-high detail, 8K resolution. Photorealistic yet stylized, like a premium product photography shot with a DSLR camera. Warm, pastel color palette, cute and minimalist design.”
prompt
A hyper-realistic 3D render of a soft felt plush [object], made of wool fabric texture with visible fiber details. Placed on a clean pure white background. Professional studio lighting with soft shadows, ultra-high detail, 8K resolution. Photorealistic yet stylized, like a premium product photography shot with a DSLR camera. Warm, pastel color palette, cute and minimalist design.
1. Understand the Core Elements of the Prompt
The prompt is packed with specifications. Break it down into components:
a. Object & Material
[object]: Replace this placeholder with your desired plush item (e.g., cat, unicorn, carrot, star).- Material: Soft felt made of wool fabric. Important: “visible fiber details” makes it look realistic.
b. Composition & Background
- Background: Always “clean pure white” for a professional look.
- Placement: Object should appear centered, isolated, and unobstructed.
c. Lighting & Rendering Style
- Professional studio lighting: Soft shadows, evenly lit, no harsh highlights.
- Ultra-high detail & 8K resolution: Ensures textures and fibers are visible.
- Photorealistic yet stylized: Balances realism with a charming, cute aesthetic.
d. Color & Mood
- Warm, pastel palette: Soft and inviting colors (peach, mint, baby blue, lavender).
- Cute and minimalist design: Simple shapes, clean lines, playful vibe.
2. Step-by-Step Usage
Step 1: Replace the [object] Placeholder
- Example replacements:
- “bear” → A hyper-realistic 3D render of a soft felt plush bear…
- “cactus” → …soft felt plush cactus…
- “moon” → …soft felt plush moon…
Tip: Start with simple shapes first; complex objects like “castle” might need additional detail prompts.
Step 2: Add Style or Design Variations
You can modify the prompt to get different visual effects:
- Extra cuteness: Add “with tiny embroidered eyes and a smiling face”
- Interactive elements: Add “holding a small heart” or “sitting on a pastel-colored cushion”
- Different textures: Add “slightly fuzzy edges” or “soft gradient felt texture”
Step 3: Adjust the Lighting & Camera
- Use phrases like:
- “DSLR-style depth of field”
- “Softbox lighting from left side”
- “Slight shadow beneath the plush for realism”
These help control the final look and make it appear like a professional product shot.
Step 4: Refine Resolution and Detail
- Keep “ultra-high detail, 8K resolution” to preserve fiber textures.
- For stylization, you can add: “slightly exaggerated proportions” or “rounded plush edges.”
Step 5: Color Palette Customization
- Change “warm, pastel color palette” to match your theme:
- Baby nursery: soft pink, mint, lavender
- Modern minimalist: cream, beige, soft gray
- Cute food plushes: pastel yellow, peach, soft green
3. Example Prompt Variations
Basic Example:
“A hyper-realistic 3D render of a soft felt plush cat, made of wool fabric texture with visible fiber details. Placed on a clean pure white background. Professional studio lighting with soft shadows, ultra-high detail, 8K resolution. Photorealistic yet stylized, like a premium product photography shot with a DSLR camera. Warm, pastel color palette, cute and minimalist design.”
Cute Embroidered Variation:
“A hyper-realistic 3D render of a soft felt plush bunny, made of wool fabric texture with visible fiber details. Tiny embroidered eyes and smiling face. Placed on a clean pure white background. Professional studio lighting with soft shadows, ultra-high detail, 8K resolution. Photorealistic yet stylized, like a premium product photography shot with a DSLR camera. Warm, pastel color palette, cute and minimalist design.”
Interactive Object Variation:
“A hyper-realistic 3D render of a soft felt plush star holding a tiny rainbow, made of wool fabric texture with visible fiber details. Placed on a clean pure white background. Professional studio lighting with soft shadows, ultra-high detail, 8K resolution. Photorealistic yet stylized, like a premium product photography shot with a DSLR camera. Warm, pastel color palette, cute and minimalist design.”
4. Tips for Best Results
- Be Specific: Small details like “embroidered eyes” or “rounded edges” make a big difference.
- Avoid clutter: Keep only one main plush object in the scene.
- Use adjectives for mood: Words like “adorable,” “soft,” “friendly” improve the aesthetic.
- Test and iterate: Slight adjustments in color, lighting, or texture descriptions can drastically improve realism.
- Combine with render modifiers: Some AI tools allow modifiers like “cinematic lighting” or “macro lens focus” to enhance realism.
5. Suggested Applications
- Product photography mockups for plush toys
- Cute character designs for children’s books
- 3D assets for games or AR apps
- Social media posts or Pinterest boards with adorable plush content
Using this approach, you can generate highly detailed, cute, and professional 3D plush renders consistently. The key is balancing realism (wool texture, 8K detail) with a minimalist, charming aesthetic.

Leave a Reply