
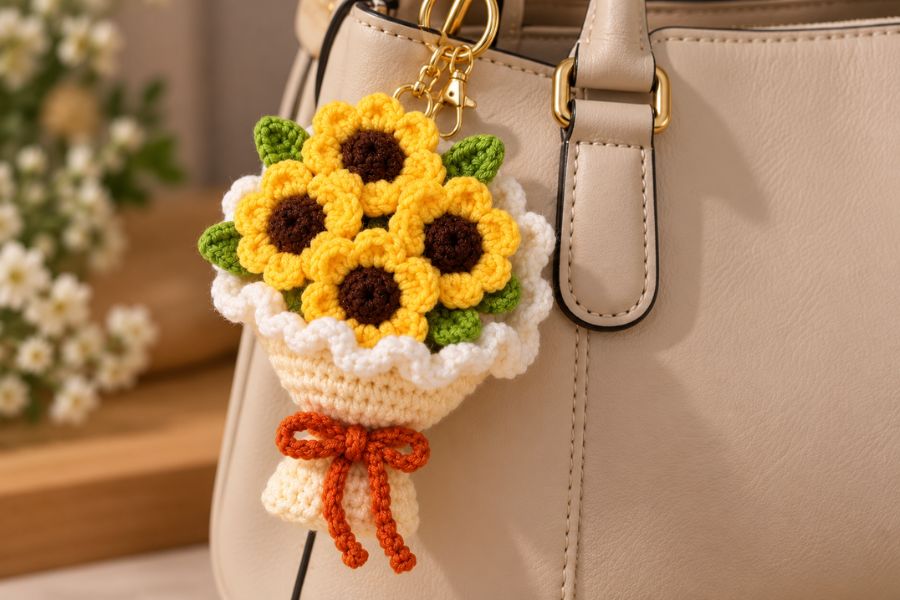
A crochet sunflower bouquet keychain is a cute, handmade accessory that brings a little sunshine wherever you go! Featuring tiny yellow sunflowers, green leaves, and a decorative bouquet wrapper, this miniature crochet project is perfect for decorating handbags, backpacks, keys, or giving as a thoughtful handmade gift.
In this step-by-step tutorial, you’ll learn how to crochet a mini sunflower bouquet keychain, from creating the bouquet base and delicate ruffle to making individual sunflower petals and leaves. The project uses basic crochet stitches, making it a fun option for beginners who want to practice their skills.
Materials You’ll Need
Before starting your crochet sunflower bouquet, gather the following supplies:
- Yarn in your preferred bouquet-wrapper color
- Brown yarn for the sunflower centers
- Yellow yarn for the sunflower petals
- Green yarn for the leaves
- White yarn for the decorative ruffle
- Crochet hook suitable for your yarn
- Fiberfill stuffing
- Scissors
- Yarn needle
- Keychain ring and small attachment loop
- Optional: Stitch markers to keep track of rounds
Beginner tip: Cotton yarn is a good choice for this project because it helps small crochet flowers hold their shape and keeps the stitches looking neat.
Crochet Abbreviations
Here are the crochet stitches and abbreviations used throughout this tutorial, written in US crochet terminology.
| Abbreviation | Meaning |
|---|---|
| MR | Magic Ring |
| CH | Chain |
| SC | Single Crochet |
| HDC | Half Double Crochet |
| DC | Double Crochet |
| SL ST | Slip Stitch |
| INC | Increase (2 SC in one stitch) |
| DEC | Decrease (2 stitches together) |
| BLO | Back Loop Only |
| FLO | Front Loop Only |
| ST | Stitch |
Important: The bouquet is worked in joined rounds. Unless otherwise specified, begin each new round with a slip stitch and a chain, following the original tutorial. These joining stitches are not counted in the stitch totals.
Step 1: Crochet the Mini Bouquet Base
The first part of this project is creating the small, rounded bouquet holder that will support your sunflower arrangement.
Round 1: Create a Magic Ring
Start by making a magic ring using your chosen bouquet-wrapper yarn.
- Wrap the yarn around your fingers to form a loop.
- Insert your crochet hook underneath the first yarn strand and catch the second strand.
- Pull the yarn through to form a loop.
- Make one chain to secure the magic ring.
- Work 6 single crochet stitches into the ring.
- Pull the yarn tail to tighten and close the center.
You should have 6 stitches at the end of Round 1.
Round 2: Increase in Every Stitch
Start with a slip stitch and one chain.
Work 2 single crochet stitches into each stitch around.
Pattern: INC × 6
Total: 12 stitches.
Round 3: Single Crochet and Increase
Start with a slip stitch and chain.
Work one single crochet into the first stitch, then an increase into the next stitch.
Repeat this pattern all the way around.
Pattern: (1 SC, INC) × 6
Total: 18 stitches.
Round 4: Two Single Crochets and Increase
For this round, work two single crochets followed by an increase.
Pattern: (2 SC, INC) × 6
Total: 24 stitches.
Round 5: Three Single Crochets and Increase
Continue expanding the base.
Pattern: (3 SC, INC) × 6
Total: 30 stitches.
Round 6: Four Single Crochets and Increase
Work four single crochet stitches, followed by an increase.
Pattern: (4 SC, INC) × 6
Total: 36 stitches.
Round 7: Crochet in the Back Loops Only
For this round, work one single crochet into the back loop of every stitch.
Pattern: 36 SC (BLO)
Working in the back loops creates a visible ridge of front loops, which will be used later to attach the white decorative ruffle.
Rounds 8–12: Build the Bouquet Shape
For the next five rounds, work one single crochet in every stitch, using both loops.
Pattern: 36 SC per round
These rounds build the sides of the bouquet holder.
Round 13: Begin Decreasing
Now it’s time to narrow the bouquet.
Work four single crochets, followed by one decrease.
Pattern: (4 SC, DEC) × 6
Total: 30 stitches.
For a neat finish, use an invisible decrease by inserting your hook through the front loops of the next two stitches before completing a single crochet.
Round 14: Continue Decreasing
Work three single crochets followed by a decrease.
Pattern: (3 SC, DEC) × 6
Total: 24 stitches.
Round 15: Decrease Around
Work one decrease repeatedly around the entire round.
Pattern: DEC × 12
Total: 12 stitches.
Add a small amount of fiberfill stuffing to give the bouquet its rounded shape.
Avoid overstuffing, as the bouquet should remain compact.
Round 16: Final Decreases
Continue decreasing around the entire round.
Pattern: DEC × 6
Total: 6 stitches.
Round 17: Create the Decorative Top
After joining the round, make two chains.
Work three double crochet stitches into each stitch around.
Pattern: 3 DC in each stitch
Total: 18 stitches.
This creates a wider, ruffled opening at the top of the bouquet.
Rounds 18–19: Finish the Bouquet Opening
Work one single crochet in every stitch for both rounds.
Pattern: 18 SC per round
Finish with a slip stitch into the first stitch.
Cut the yarn, fasten off, and weave in the remaining end.
Your mini crochet bouquet holder is now complete!
Step 2: Make the White Decorative Ruffle
The white ruffle adds a delicate finishing touch to the bouquet and gives it the appearance of a miniature wrapped flower arrangement.
Round 1: Attach the White Yarn
Remember the unused front loops from Round 7?
These are where you’ll attach your white yarn.
- Make a slip knot with your white yarn.
- Insert the hook into one of the exposed front loops from Round 7.
- Pull the white yarn through and make one chain.
- Work one single crochet into each exposed front loop around the bouquet.
- Join with a slip stitch.
You should have approximately 36 single crochet stitches.
Round 2: Create the Ruffle Effect
Start with two chains.
Work three half double crochet stitches into each stitch around.
To create the textured ruffle shown in the tutorial, alternate between the front and back loops:
- First stitch: 3 HDC into the front loop.
- Second stitch: 3 HDC into the back loop.
- Third stitch: 3 HDC into the front loop.
- Fourth stitch: 3 HDC into the back loop.
Continue alternating until you reach the end of the round.
Join with a slip stitch into the first half double crochet.
Cut the yarn, fasten off, and weave in the ends.
The result is a lovely, wavy white border around your miniature bouquet.
Step 3: Crochet the Mini Sunflowers 🌻
Now comes the most colorful part of this DIY project: making the tiny sunflowers!
Each sunflower consists of a brown center surrounded by six yellow petals.
You’ll need to make four mini sunflowers for the bouquet.
Part A: Crochet the Brown Sunflower Center
Using brown yarn, create a magic ring.
Round 1: Work 6 SC into the magic ring.
Pull the tail to close the ring.
Round 2: Work 1 SC into each stitch around.
Total: 6 stitches.
Join with a slip stitch, cut the yarn, and weave in the end.
You now have a small, rounded brown sunflower center.
Part B: Add the Yellow Sunflower Petals
Change to yellow yarn.
Attach the yellow yarn to one stitch along the edge of the brown center.
To create each petal:
- Chain 1.
- Work 1 HDC into the same stitch.
- Work 1 DC into the same stitch.
- Work another HDC into the same stitch.
- Chain 1.
- Slip stitch into the next stitch.
This creates one small, rounded sunflower petal.
Repeat the pattern around the flower until you have six petals.
Petal pattern
CH 1, HDC, DC, HDC, CH 1, SL STThe three taller stitches are worked into the same base stitch. The slip stitch anchors the petal before beginning the next one.
After completing all six petals, join with a slip stitch, cut the yarn, and weave in the ends.
Repeat these steps until you have four complete crochet sunflowers.
Tip: Keep your tension consistent so all four flowers are approximately the same size.
Step 4: Crochet the Mini Green Leaves
Small green leaves add contrast and help make your sunflower bouquet look more realistic.
Each leaf is made using a short foundation chain and a combination of basic crochet stitches.
Leaf Pattern
Using green yarn:
- Make a slip knot.
- Chain 6.
- Skip the first chain from the hook.
- Work 1 SC into the second chain.
- Work 1 HDC into the next chain.
- Work 1 DC into the next chain.
- Work 1 HDC into the following chain.
- Work 1 SC into the last chain.
Cut the yarn and weave in the ends, leaving a longer tail if you plan to sew the leaf into the arrangement.
This stitch combination gives each leaf a slightly wider middle and narrower ends.
Make four leaves for the bouquet, or add more if you prefer a fuller arrangement.
Step 5: Assemble the Crochet Sunflower Bouquet
Once all your crochet pieces are finished, it’s time to bring everything together.
Arrange the Sunflowers
Position the four mini sunflowers at the top of the bouquet.
You can place two flowers in front and two slightly behind them to create a fuller appearance.
Adjust the arrangement until you are happy with how the sunflowers look.
Attach the Leaves
Place the green leaves between and around the sunflowers.
Try to keep some green visible between the yellow petals to create a natural-looking bouquet.
Secure Everything
Use a yarn needle and matching yarn to sew the flowers and leaves securely to the bouquet opening.
Make several small stitches to keep each component firmly attached.
Ensure that all yarn tails are hidden inside the bouquet or neatly woven into the stitches.
The provided transcript demonstrates how to crochet the individual pieces, but does not give detailed assembly instructions. This arrangement is a suggested way to finish the project.
Step 6: Turn the Sunflower Bouquet Into a Keychain
To transform your miniature bouquet into a functional crochet keychain, you’ll need a keychain ring and a secure attachment loop.
- Attach a short, sturdy yarn loop to the back or top edge of the bouquet.
- Reinforce the loop with several stitches using a yarn needle.
- Thread the loop through a keychain ring or clasp.
- Check that the attachment is secure before using it.
Your handmade sunflower bouquet keychain is ready to decorate your favorite bag, backpack, or set of keys!
Quick Crochet Pattern Summary
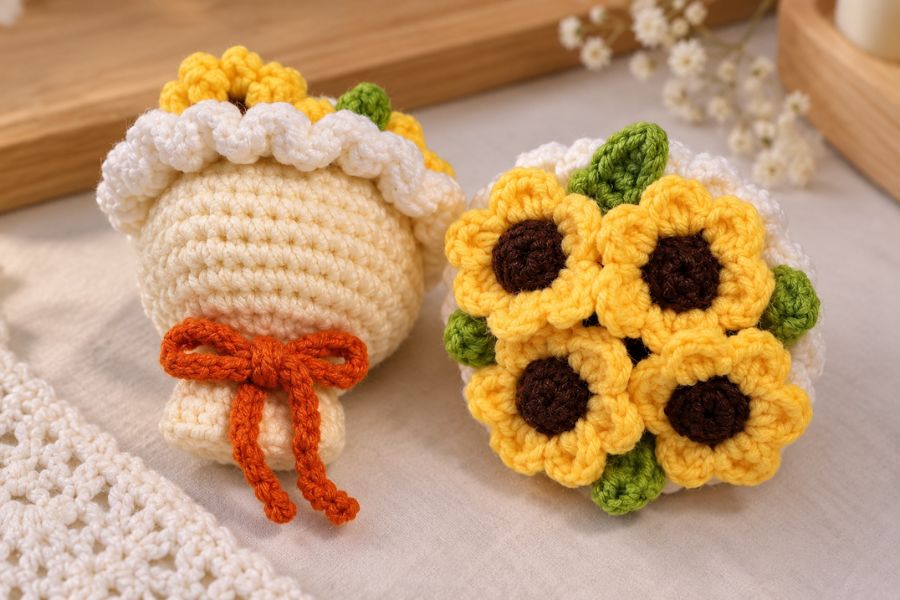
Here is a convenient overview of the crochet sunflower bouquet pattern.
| Part | Pattern | Quantity |
|---|---|---|
| Bouquet base | Rounds 1–19 | 1 |
| White ruffle | 2 decorative rounds | 1 |
| Brown sunflower center | 6 SC, then 6 SC | 4 |
| Yellow petals | 6 petals per flower | 24 petals |
| Green leaves | CH 6, SC, HDC, DC, HDC, SC | 4 |
| Keychain attachment | Secure yarn loop and ring | 1 |
Tips for Making a Beautiful Crochet Sunflower Bouquet Keychain
1. Choose complementary colors. Classic yellow petals and dark brown centers create the traditional sunflower look. For the bouquet wrapper, consider cream, beige, light pink, or pastel green.
2. Use a smaller crochet hook for tighter stitches. Tight, even stitches help maintain the shape of miniature crochet accessories.
3. Don’t overstuff the bouquet. A little fiberfill is enough to maintain the rounded structure without making the project bulky.
4. Make your flowers uniform. Using the same yarn weight and stitch tension for each sunflower will help your finished bouquet look balanced.
5. Secure the flowers carefully. If you plan to use your crochet sunflower bouquet as a bag charm or keychain, reinforce the attachment points so the flowers stay in place during everyday use.
Final Thoughts
Making a crochet sunflower bouquet keychain is a fun and rewarding way to turn a few basic crochet stitches into a beautiful handmade accessory.
From the rounded bouquet wrapper and delicate white ruffle to the cheerful yellow sunflowers and tiny green leaves, every detail gives this miniature project its charm.
Whether you’re making one for yourself, creating a thoughtful handmade gift, or exploring new easy crochet keychain ideas, this mini sunflower bouquet is a lovely project to try.
Once you’ve finished your first bouquet, experiment with different flower colors, wrapper styles, and leaf arrangements to create your own unique crochet designs.
Happy crocheting! 🌻

Leave a Reply