
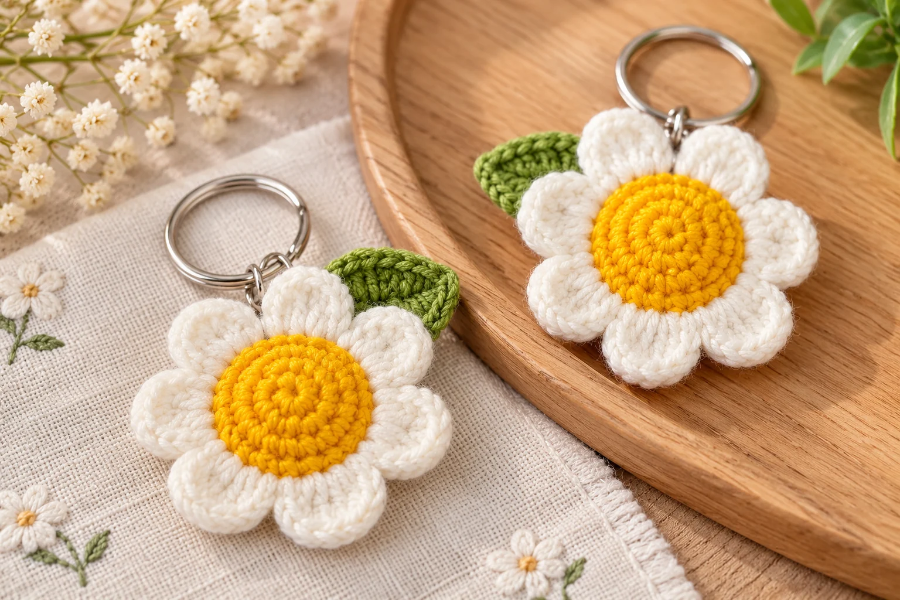
Looking for a cute and easy crochet project you can finish in less than 30 minutes? This crochet daisy keychain tutorial is perfect for beginners who love making small, adorable accessories!
With its bright yellow center, soft white petals, and little green leaf, this handmade daisy keychain is a beautiful way to decorate your keys, handbags, backpacks, or purses.
The best part? You only need a few basic crochet supplies and simple stitches to create this adorable flower charm.
In this step-by-step tutorial, you’ll learn how to crochet a daisy keychain, including the flower center, eight white petals, a matching green leaf, and how to assemble everything into a finished keychain.
Crochet Daisy Keychain: Project Overview
- Skill Level: Beginner-friendly
- Time Required: Approximately 30 minutes
- Crochet Hook: 2.5 mm
- Yarn Colors: White, yellow, and green
- Techniques: Magic ring, single crochet, increases, double crochet, treble crochet, and slip stitch
- Finished Project: Mini crochet daisy flower keychain with a green leaf
This quick crochet project is perfect for using leftover yarn and making thoughtful handmade gifts.
Materials You’ll Need
Before starting your crochet daisy keychain, gather these supplies:
- White acrylic yarn for the daisy petals
- Yellow acrylic yarn for the flower center
- Green acrylic yarn for the back of the flower and leaf
- 2.5 mm crochet hook
- Scissors
- Stitch marker (optional)
- Yarn needle or darning needle
- Key ring or keychain hardware
- Small jump ring for attaching the leaf
- Polyester fiberfill or scrap yarn for stuffing
Beginner Tip: If you don’t have a stitch marker, you can use a small piece of contrasting yarn to mark the beginning of each round.
Crochet Abbreviations (US Terms)
| Abbreviation | Meaning |
|---|---|
| MR | Magic Ring |
| CH | Chain |
| SC | Single Crochet |
| HDC | Half Double Crochet |
| DC | Double Crochet |
| TR | Treble Crochet |
| SL ST | Slip Stitch |
| INC | Increase (2 SC in the same stitch) |
| ST | Stitch |
| FO | Fasten Off |
Important: This pattern uses US crochet terminology. The flower centers are worked in joined rounds, and each new round starts with a chain 1 that does not count as a stitch.
Step 1: Crochet the Yellow Daisy Center
We’ll begin by making the round yellow center of our daisy flower.
Round 1: Make a Magic Ring (6 SC)
- Take your yellow yarn and create a magic ring.
- Insert your crochet hook into the ring.
- Yarn over and pull up a loop.
- Yarn over again and pull through both loops to complete your first single crochet.
- Continue making single crochet stitches until you have six SC inside the ring.
- Pull the yarn tail gently to close the center.
- Join the round with a slip stitch into the first single crochet.
Stitch Count: 6 SC
Round 2: Increase in Every Stitch (12 SC)
- Chain 1.
- Work 2 single crochet stitches into the first stitch.
- Continue making 2 SC in every stitch around.
- Join with a slip stitch into the first SC.
Pattern: INC × 6
Stitch Count: 12 SC
An increase simply means making two single crochet stitches into the same stitch.
Round 3: Alternate Single Crochet and Increase (18 SC)
- Chain 1.
- Work 1 SC into the first stitch.
- Work 2 SC into the next stitch.
- Repeat this sequence around the circle.
- Join with a slip stitch.
Pattern: (1 SC, INC) × 6
Stitch Count: 18 SC
Your yellow center should now begin to look like a small, flat crochet circle.
Round 4: Continue Increasing (24 SC)
- Chain 1.
- Make 1 SC in each of the next two stitches.
- Work 2 SC in the third stitch.
- Repeat this pattern around the entire circle.
- Close the round with a slip stitch.
Pattern: (2 SC, INC) × 6
Stitch Count: 24 SC
Round 5: Single Crochet Around (24 SC)
- Chain 1.
- Make 1 SC into every stitch around.
- Do not increase in this round.
- Join with a slip stitch.
Pattern: 1 SC in each stitch.
Stitch Count: 24 SC
Fasten off your yellow yarn, leaving enough tail to weave into the back of your work.
You have now completed the yellow center of your crochet daisy!
Step 2: Crochet the Green Back of the Flower
Next, we’ll make a second circular piece using green yarn.
This green circle will form the back of the daisy and help give the finished keychain a neat, slightly three-dimensional appearance.
Follow the exact same five-round pattern used for the yellow center.
| Round | Pattern | Stitch Count |
|---|---|---|
| 1 | 6 SC into MR | 6 |
| 2 | INC in every stitch | 12 |
| 3 | (1 SC, INC) × 6 | 18 |
| 4 | (2 SC, INC) × 6 | 24 |
| 5 | 1 SC in each stitch | 24 |
After completing Round 5, fasten off and weave in the yarn tail.
You should now have two matching crochet circles: one yellow and one green.
Step 3: Join the Two Flower Centers
Place the yellow and green circles together with their wrong sides facing each other.
Make sure their stitches are aligned.
Next, attach your white yarn through the corresponding stitches of both circles.
You’ll work the daisy petals through both layers, joining the yellow front and green back as you crochet.
This technique creates a neat flower edge while keeping the center securely attached.
Don’t worry about stuffing the flower yet. We’ll add the stuffing after completing the first six petals.
Step 4: Crochet the White Daisy Petals
Now comes the fun part: making the beautiful white petals!
Our daisy will have eight crochet petals, evenly spaced around its center.
Each petal is created using a combination of chains, double crochet, treble crochet, and slip stitches.
How to Crochet One Daisy Petal
With your white yarn attached through both circles:
- Chain 2.
- Make 1 DC into the same stitch.
- Into the next stitch, work 3 TR.
- Make 1 DC into the following stitch.
- Chain 2.
- Make a slip stitch into the same stitch where you made the last DC.
You’ve completed your first daisy petal!
Daisy Petal Pattern
(CH 2, DC, 3 TR in next ST, DC in next ST, CH 2, SL ST in same ST)
The tall treble crochet stitches create the rounded top of the petal, while the shorter stitches shape its sides.
Repeat to Make Eight Petals
To start your next petal:
- Slip stitch into the next available stitch.
- Chain 2.
- Make 1 DC into the same stitch.
- Work 3 TR into the next stitch.
- Make 1 DC into the following stitch.
- Chain 2 and slip stitch into that same stitch.
Continue repeating this pattern around the flower, using both layers of the center.
Since each petal uses three stitches around the flower’s edge, the 24 stitches will create exactly eight petals.
Add Stuffing After Six Petals
After completing your sixth petal, stop briefly to fill the flower center.
You can use:
- A small amount of polyester fiberfill
- Leftover yarn scraps
- Soft stuffing from another crochet project
Add just enough stuffing to make the center slightly puffy without stretching your stitches.
Tip: Avoid overstuffing your daisy. A small amount will help the flower keep its cute, rounded shape.
Once you’ve added the stuffing, crochet the final two petals using the same pattern.
Finish the Daisy Flower
After completing all eight petals:
- Slip stitch into the starting point to close the flower.
- Bring the working yarn toward the back.
- Make one chain.
- Cut the yarn, leaving a short tail.
- Pull the yarn through to fasten off.
- Use a darning needle to weave the loose end securely into the back.
Your crochet daisy flower is now complete!
Step 5: Crochet the Green Leaf
A small green leaf gives this daisy keychain an extra touch of charm.
This leaf is made by crocheting around both sides of a foundation chain.
Start With a Foundation Chain
- Take your green yarn.
- Make a slip knot.
- Chain 10.
You should now have a foundation chain with ten stitches.
Crochet the First Side of the Leaf
Starting in the second chain from your hook, work the following stitches:
| Chain Position | Stitch |
|---|---|
| 2nd chain | 1 SC |
| 3rd chain | 1 HDC |
| 4th chain | 1 DC |
| 5th chain | 1 TR |
| 6th chain | 1 TR |
| 7th chain | 1 TR |
| 8th chain | 1 DC |
| 9th chain | 1 HDC |
| 10th chain | 3 SC |
Making three single crochet stitches in the last chain helps you turn around the tip of the leaf.
Crochet the Opposite Side
Now rotate your work and crochet along the unused loops on the opposite side of the foundation chain.
Work the following stitches:
- 1 HDC
- 1 DC
- 1 TR
- 1 TR
- 1 TR
- 1 DC
- 1 HDC
- 1 SC
Join with a slip stitch into the first single crochet.
Chain 1, fasten off, and cut the yarn.
Use your yarn needle to weave the loose end into the back of the leaf.
Your little green leaf is now ready!
Beginner Tip: Gently shape the leaf using your fingers. The combination of short and tall crochet stitches creates a lovely oval leaf shape.
Step 6: Attach the Daisy to the Keychain
Now it’s time to turn your crochet flower into a functional keychain.
Attach the Key Ring
- Take your finished crochet daisy.
- Choose a secure attachment point near the edge, between two petals.
- Open your keychain hardware.
- Attach it through a sturdy stitch at the base of a petal, making sure it catches the joined flower layers.
- Close the hardware securely.
You can choose any position around the flower, depending on how you want your daisy to hang.
Attach the Green Leaf
- Take a small jump ring.
- Attach it through a secure stitch near the base of the crochet leaf.
- Connect the jump ring to your keychain hardware.
- Close the jump ring completely.
And that’s it! Your adorable crochet daisy flower keychain is ready to use.
Tips for Making the Perfect Crochet Daisy Keychain
If you’re making this project for the first time, these simple tips will help you achieve a neat and beautiful result.
1. Keep your stitches consistent. Try to maintain even tension so your flower center stays round and your petals look balanced.
2. Use a stitch marker. Marking your first stitch makes it easier to keep track of each round, especially when working increases.
3. Count your stitches carefully. Each flower center should have 24 stitches after Round 5. This ensures all eight petals fit neatly around the edge.
4. Don’t overstuff the center. A small amount of filling creates a cute, puffy daisy without making it bulky.
5. Secure the keychain hardware. Make sure your jump rings are fully closed and attached to sturdy stitches so your handmade flower won’t fall off easily.
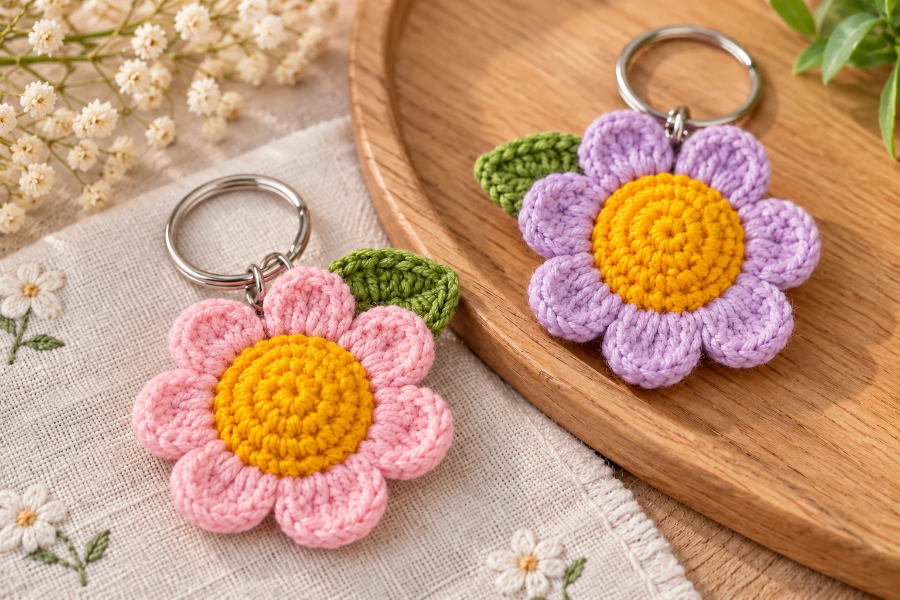
6. Choose your favorite yarn colors. While classic daisies have white petals and yellow centers, you can experiment with pink, purple, blue, or pastel shades.
Creative Crochet Daisy Keychain Ideas
Once you’ve mastered the basic pattern, try customizing your daisy keychains with different styles and colors.
1. Classic White and Yellow Daisy
The traditional combination of white petals, a bright yellow center, and a green leaf creates a timeless floral accessory.
2. Pastel Pink Daisy Keychain
Replace the white yarn with soft pink for a sweet, aesthetic flower keychain that’s perfect for decorating handbags.
3. Mini Daisy Bag Charm
Attach your flower to a lobster clasp instead of a regular key ring to make an adorable crochet bag charm.
4. Colorful Daisy Keychain Set
Create several crochet daisies in different colors and group them together for a matching handmade keychain collection.
5. Daisy Keychain With Two Leaves
Make an extra green leaf and attach both leaves beneath the flower for a fuller floral design.
Why You’ll Love This Easy Crochet Keychain Project
This DIY crochet daisy keychain has plenty of wonderful features.
- Quick to make: A great small project you can complete in about 30 minutes with practice.
- Beginner-friendly: Uses common crochet stitches and simple increases.
- Budget-friendly: Requires only small amounts of yarn.
- Customizable: Easy to personalize with different yarn colors and accessories.
- Perfect for gifting: A thoughtful handmade present for friends, family, or teachers.
- Great for craft markets: These adorable flower charms are small, lightweight, and suitable for handmade accessory collections.
Whether you’re looking for easy crochet keychain ideas or quick projects using scrap yarn, this little daisy is a fun option.
Frequently Asked Questions
Is this crochet daisy keychain suitable for beginners?
Yes! This pattern is beginner-friendly, especially if you already know how to make a magic ring, single crochet, double crochet, and treble crochet stitches. Beginners can take their time practicing each step.
How long does it take to crochet a daisy keychain?
This crochet daisy keychain can take approximately 30 minutes for someone familiar with basic crochet techniques. If you’re a complete beginner, allow a little extra time.
What yarn is best for crochet daisy keychains?
Acrylic or cotton yarn works well for this project. Cotton yarn offers good stitch definition, while acrylic yarn is affordable and available in many colors. Choose a yarn weight that works comfortably with your 2.5 mm crochet hook.
Can I make this crochet daisy without stuffing?
Yes! You can skip the stuffing for a flatter flower. However, adding a small amount creates a slightly raised center that gives the daisy a cute, three-dimensional appearance.
Can I use this daisy as a bag charm?
Absolutely! Replace the standard key ring with a lobster clasp or suitable bag charm clip. You can attach it to a handbag, backpack, or purse.
How many petals does the crochet daisy have?
This pattern includes eight white crochet petals arranged around a 24-stitch flower center.
Final Thoughts
Making your own crochet daisy keychain is a fun, relaxing, and rewarding way to practice your crochet skills while creating something beautiful and useful.
With a cheerful yellow center, eight delicate white petals, and a tiny green leaf, this mini crochet flower makes an adorable accessory for your keys, bags, or backpacks.
It’s also a wonderful handmade gift idea and a great addition to your collection of easy crochet projects.
Try experimenting with different colors and sizes to create your own unique daisy keychains.
Happy crocheting! 🌼
If you enjoyed this easy crochet daisy keychain tutorial, share your finished flower and let us know which color combination you’d love to try next!

Leave a Reply